VNGRS
Understanding CORS with AWS API Gateway
2024-9-19
Gözde Yavuz
Welcome back! In this fourth installment of the blog series, we’re shifting our focus to a crucial aspect of API management: configuring Cross-Origin Resource Sharing (CORS) in AWS API Gateway. As your applications grow and interact with different domains, handling cross-origin requests effectively becomes essential. In this post, we’ll delve into the importance of CORS, walk through the steps to set it up in AWS API Gateway, and share best practices to ensure your APIs are accessible and secure. By the end of this article, you’ll have a solid understanding of how to manage CORS configurations to facilitate smooth communication across different domains.
What We’ve Learned So Far
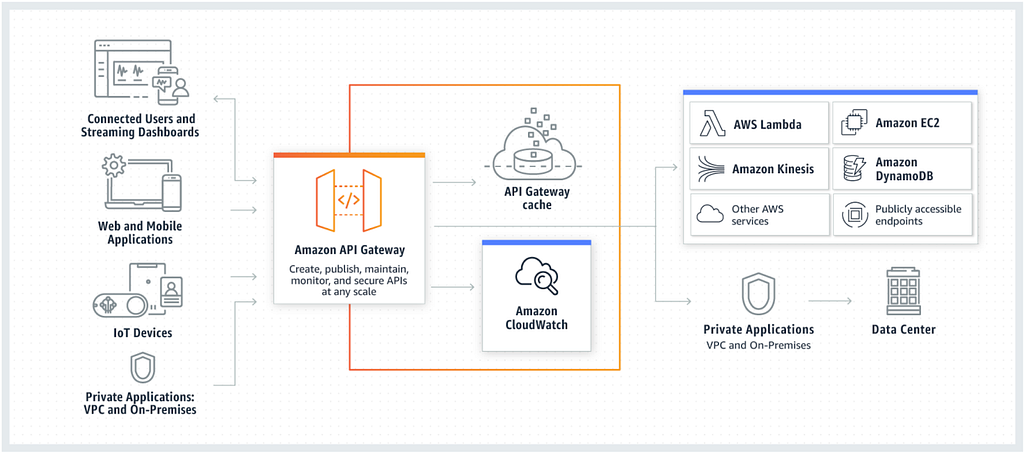
As we’ve progressed through this series on AWS API Gateway, I’ve covered some fundamental yet powerful features that have transformed how we approach API management. From basic API creation and endpoint configuration to more advanced topics like Lambda Authorizers and Usage Plans, I’ve uncovered the tools and strategies needed to build secure, scalable, and efficient APIs. Now, we’ll be taking a closer look at CORS with AWS API Gateway and how to configure it for secure cross-origin requests.
To summarize simply; CORS, or Cross-Origin Resource Sharing, is a crucial security feature implemented by browsers to protect users from potentially malicious websites. Understanding and configuring CORS is essential when you’re developing APIs, particularly for web applications. It determines which resources your API can share with web pages hosted on different domains, effectively controlling how your API interacts with various client-side applications. Without proper CORS settings, your API might either be too restrictive, blocking legitimate requests, or too permissive, leaving it vulnerable to cross-origin attacks. In this post, we’ll take a closer look at what CORS is, why it’s vital for secure web development, and step-by-step guidance on how to correctly set it up in AWS API Gateway to ensure your applications remain functional and secure.
What is CORS?
Definition and Importance
CORS stands for Cross-Origin Resource Sharing. It allows a web application running on one domain to make requests to a server on a different domain. Without CORS, many modern web applications wouldn’t work because they often need to communicate with servers across different domains.
How CORS Works
When a browser requests a different domain (cross-origin), it first sends a preflight request. This is a small request to check if the server allows the actual request. The server responds with certain headers that tell the browser whether it’s okay to proceed with the request. If the server doesn’t return the correct CORS headers, the browser will block the request.

Configuring CORS in AWS API Gateway
Setting up CORS in AWS API Gateway is straightforward but requires attention to detail. Here’s how you can do it.
Step 1: Enable CORS on an API Gateway Resource
- Go to the AWS Management Console and open the API Gateway service.
- Select your API and choose the method (e.g., GET, POST) you want to enable CORS for.
- In the Method Execution view, click on Method Response.
- Edit the 200 response (or any other response code you need), and click Add Header. Add the following headers:
Access-Control-Allow-Origin
Access-Control-Allow-Methods
Access-Control-Allow-Headers
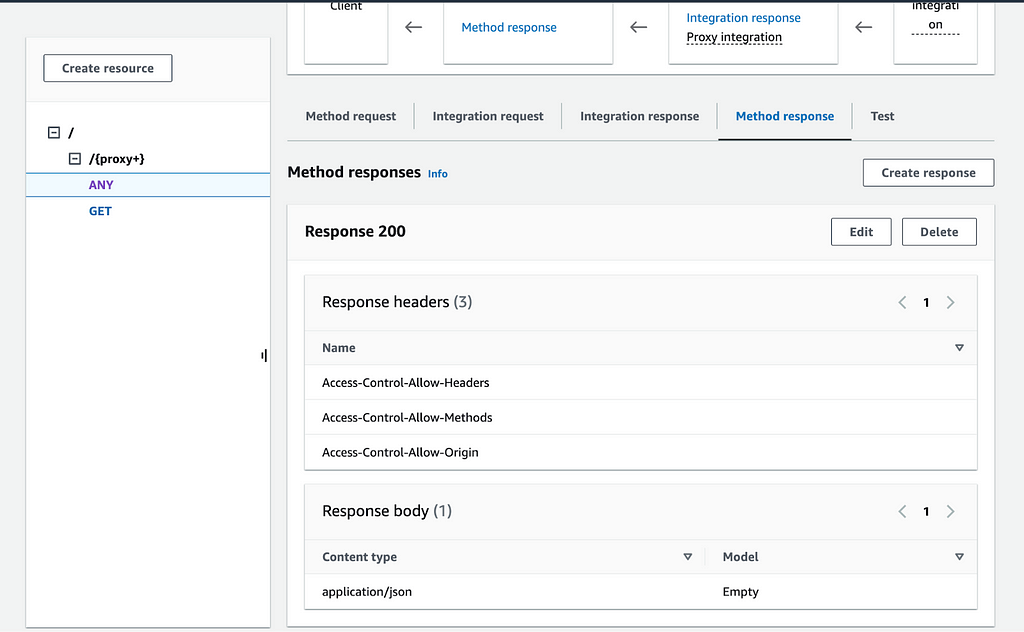
- Go back and select Integration Response. Edit the 200 response again, and add the same headers under the Header Mappings section.
Step 2: Set Up the OPTIONS Method
- In the API Gateway console, add a new method to the resource: OPTIONS.
- Set up a Mock Integration for the OPTIONS method.
- In the Method Response and Integration Response, add the following headers:
Access-Control-Allow-Origin
Access-Control-Allow-Methods
Access-Control-Allow-Headers
- Specify the values for these headers. For example:
- Access-Control-Allow-Origin: * (allows all origins, but you can specify your domain)
- Access-Control-Allow-Methods: GET, POST, OPTIONS (specify the methods you want to allow)
- Access-Control-Allow-Headers: Content-Type, Authorization (specify the headers you want to allow)
Step 3: Deploy the API
- Once you’ve configured CORS, deploy your API to the appropriate stage.
- Test your API by making requests from a web application or using tools like Postman to ensure the CORS configuration works correctly.
- Alternatively, you can enable CORS automatically in AWS by clicking the ‘Enable CORS’ button and following the prompts. AWS will then automatically configure the necessary CORS settings for your methods.


Troubleshooting Common CORS Issues
Common Problems and Misconfigurations
A common issue is forgetting to add CORS headers in both the Method Response and Integration Response. If these headers are missing, the browser will block the request.
Another issue is not allowing the correct HTTP methods. Ensure that your API supports the methods (e.g., GET, POST) your application needs.
Debugging CORS Errors
If you encounter CORS errors, use the browser’s developer tools (usually in the Console tab) to see the exact error message. This can help you pinpoint which headers or methods are missing.
Tools like Postman can help you test your API without worrying about CORS, allowing you to isolate issues.
Best Practices for CORS Configuration
Security Considerations
While you can allow all origins with Access-Control-Allow-Origin: *, it’s safer to specify only the domains you trust. This limits the risk of malicious sites making unauthorized requests to your API.
Be careful with Access-Control-Allow-Headers and Access-Control-Allow-Methods. Only allow the headers and methods your application truly needs.
Optimizing Performance
To reduce the overhead of CORS, you can cache the preflight response by setting the Access-Control-Max-Age header. This tells the browser how long it can cache the preflight response before needing to make another preflight request.
Real-World Use Cases
Single-Page Applications (SPAs)
SPAs often need to make API requests to different domains. Properly configuring CORS in API Gateway allows these applications to communicate with your backend services seamlessly.
Microservices Architecture
In a microservices architecture, different services might be hosted on different domains or subdomains. CORS configuration ensures that these services can interact securely.
Conclusion
Summary of Key Points
CORS is an essential security feature that allows web applications to make requests to different domains. Configuring CORS correctly in AWS API Gateway ensures that your APIs are secure and accessible.
Further Reading
For more information, check out the AWS API Gateway documentation on CORS. It provides detailed instructions and best practices for setting up CORS in various scenarios.
What is Next?
As I bring this post to a close, I hope you’ve gained valuable insights into configuring CORS in AWS API Gateway and its significance in ensuring smooth cross-origin communication. Mastering CORS is vital for any developer working with APIs, and with this knowledge, you’re now better equipped to manage your API interactions effectively.
In my next post, I’ll be diving into another key topic: configuring API Gateway with OpenAPI YAML. I’ll also demonstrate how to implement this configuration using Terraform, providing you with the tools to streamline your API deployments.
Thank you for following along, and I encourage you to stay tuned for the upcoming post. As always, your feedback and questions are welcome — let’s continue this learning journey together!
Understanding CORS with AWS API Gateway was originally published in VNGRS on Medium, where people are continuing the conversation by highlighting and responding to this story.